HUNT FOR SATOSHI NAKAMOTO TURNS UP THE USUAL SUSPECT
Like the search for the Lock Ness Monster or Bigfoot, the hunt for Satoshi Nakamoto may never have a happy ending. A revolutionary invention that may yet change how the entire world does business, but without a known inventor will forever create rampant speculation, conspiracy theorists, and basic human curiosity. It seems to have certainly captured the imagination of British author Dominic Frisby who, in his new book “Bitcoin – The Future of Money?”, searches for the truth behind the name behind the 21st-century currency.
The Hunt For Satoshi Nakamoto
Frisby has spent the last several months turning up many stones in search of some answers, and his All Points Bulletin (APB) leads to only one man, Nick Szabo. Nick has a rich history is digital currency that dates back well before Bitcoin over the last 25 years. This is not the first time Nick Szabo has been chosen as the one who started Bitcoin. Szabo is most well-known as the earliest proponent and possible inventor of the Smart Contract concept, back in 1997. The tea leaves that Frisby has read in his hunt for Satoshi Nakamoto include: Similarities in writing styles between Nakamoto and Szabo, Szabo creating precursors of digital money concept in his past, similarities in time zones and sleep time patterns, the same operating system usage, and coding language matches. Frisby states:
“What for me was a humdinger: Szabo worked for David Chaum’s Digicash (a digital currency model that worked on a centralized system, founded by Chaum in 1990). I even found his old Digicash email address.”
The last time someone had decided they had found pay-dirt in the hunt for Satoshi Nakamoto was Newsweek’s infamous outing of Dorian Nakamoto. Just sharing Satoshi’s last name, and living on the West Coast isn’t a great starting point for finding the genesis of a global crypto-currency, under the legendary journalism name of Newsweek. This caused immense invasion of privacy issues, both publicly and with government forces, leading to him suing Newsweek for the alleged error in reporting.
Could this book lead to such an outcome? Most probably not, as Frisby has said before, publicly, that he cannot say Szabo is Satoshi Nakamoto definitively. He has many pieces of circumstantial evidence, and a lack of other potential creators who would fit the profile of a digital currency inventor, hell-bent on privacy. Frisby said to IBTimes UK:
“There is no proof, just a great deal of circumstantial evidence. Szabo denies it….I try to keep an open mind, and if someone can come up with a better candidate I’ll take a look, but as (of) yet there isn’t one.”
The reasons for Szabo, Satoshi Nakamoto, or any inventor of a revolutionary protocol to remain private are obvious. Just follow the recent story of harassment of Dorian Nakamoto, and then multiply that times ten. Being the creator of better money and technology can make plenty of enemies within the status quo, the ones who are more than happy with the downsides of our current economic state. Apple needed a Steve Jobs. Bitcoin not so much. The hunt for Satoshi Nakamoto will continue.
What is much more relevant is the tech has proven solid and highly functional in the real-world. Nothing is perfect, but Bitcoin has clear advantages over many of the current financial standards, and this is only a first “app”. The Blockchain’s future is so bright I gotta wear shades!
The Android 5.0 update adds a variety of new features for your apps, such as notifications on the lock screen, an all-new camera API, OpenGL ES 3.1, the new Material design interface, and much more.
Android 5.0 Lollipop
Welcome to Android 5.0 Lollipop—the largest and most ambitious release for Android yet!
This release is packed with new features for users and thousands of new APIs for developers. It extends Android even further, from phones, tablets, and wearables, to TVs and cars.
For a closer look at the new developer APIs, see the Android 5.0 API Overview. Or, read more about Android 5.0 below.
Material design
Android 5.0 brings Material design to Android and gives you an expanded UI toolkit for integrating the new design patterns easily in your apps.
New 3D views let you set a z-level to raise elements off of the view hierarchy and cast realtime shadows, even as they move.
Built-in activity transitions take the user seamlessly from one state to another with beautiful, animated motion. The material theme adds transitions for your activities, including the ability to use shared visual elements across activities.
Document-centric apps
Android 5.0 introduces a redesigned Overview space (formerly called Recents) that’s more versatile and useful for multitasking.
New APIs allow you to show separate activities in your app as individual documents alongside other recent screens.
You can take advantage of concurrent documents to provide users instant access to more of your content or services. For example, you might use concurrent documents to represent files in a productivity app, player matches in a game, or chats in a messaging app.
Advanced connectivity
Android 5.0 adds new APIs that allow apps to perform concurrent operations with Bluetooth Low Energy (BLE), allowing both scanning (central mode) and advertising (peripheral mode).
New multi-networking features allow apps to query available networks for available features such as whether they are Wi-Fi, cellular, metered, or provide certain network features. Then the app can request a connection and respond to connectivity loss or other network changes.
NFC APIs now allow apps to register an NFC application ID (AID) dynamically. They can also set the preferred card emulation service per active service and create an NDEF record containing UTF-8 text data.
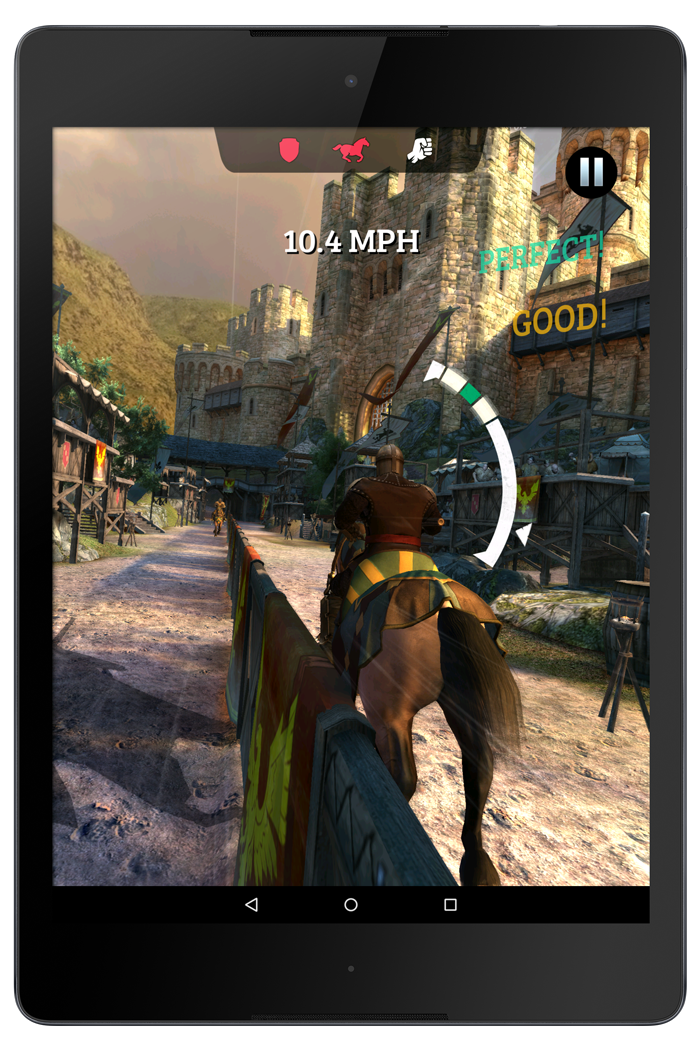
Gameloft's Rival Knights uses ASTC (Adaptive Scalable Texture Compression) from AEP and Compute Shaders from ES 3.1 to deliver HDR (High Dynamic Range) Bloom effects and provide more graphical detail.
High-performance graphics
Support for Khronos OpenGL ES 3.1 now provides games and other apps the highest-performance 2D and 3D graphics capabilities on supported devices.
OpenGL ES 3.1 adds compute shaders, stencil textures, accelerated visual effects, high quality ETC2/EAC texture compression, advanced texture rendering, standardized texture size and render-buffer formats, and more.
Gameloft's Rival Knights uses ASTC (Adaptive Scalable Texture Compression) from AEP and Compute Shaders from ES 3.1 to deliver HDR (High Dynamic Range) Bloom effects and provide more graphical detail.
Android 5.0 also introduces the Android Extension Pack (AEP), a set of OpenGL ES extensions that give you access to features like tessellation shaders, geometry shaders, ASTC texture compression, per-sample interpolation and shading, and other advanced rendering capabilities. With AEP you can deliver high-performance graphics across a range of GPUs.
More powerful audio
A new audio-capture design offers low-latency audio input. The new design includes: a fast capture thread that never blocks except during a read; fast track capture clients at native sample rate, channel count, and bit depth; and normal capture clients offer re sampling, up/down channel mix, and up/down bit depth.
Multi-channel audio stream mixing allows professional audio apps to mix up to eight channels including 5.1 and 7.1 channels.
Apps can expose their media content and browse media from other apps, then request playback. Content is exposed through a query able interface and does not need to reside on the device.
Apps have finer-grain control over text-to-speech synthesis through voice profiles that are associated with specific locales, quality and latency rating. New APIs also improve support for synthesis error checking, network synthesis, language discovery, and network fallback.
Android now includes support for standard USB audio peripherals, allowing users to connect USB headsets, speakers, microphones, or other high performance digital peripherals. Android 5.0 also adds support for Opus audio codecs.
New MediaSession APIs for controlling media playback now make it easier to provide consistent media controls across screens and other controllers.
Enhanced camera & video
Android 5.0 introduces all new camera APIs that let you capture raw formats such as YUV and Bayer RAW, and control parameters such as exposure time, ISO sensitivity, and frame duration on a per-frame basis. The new fully-synchronized camera pipeline allows you to capture uncompressed full-resolution YUV images at 30 FPS on supported devices.
Along with images, you can also capture metadata like noise models and optical information from the camera.
Apps sending video streams over the network can now take advantage of H.265 High Efficiency Video Coding (HEVC) for optimized encoding and decoding of video data.
Android 5.0 also adds support for multimedia tunneling to provide the best experience for ultra-high definition (4K) content and the ability to play compressed audio and video data together.
Users have a unified view of their personal and work apps, which are badged for easy identification.
Android in the workplace
To enable bring-your-own-device for enterprise environments, a new managed provisioning process creates a secure work profile on the device. In the launcher, apps are shown with a Work badge to indicate that the app and its data are administered inside of the work profile by an IT administrator.
Notifications for both the personal and work profile are visible in a unified view. The data for each profile is always kept separate and secure from each other, including when the same app is used by both profiles.
For company-owned devices, IT administrators can start with a new device and configure it with a device owner. Employers can issue these devices with a device owner app already installed that can configure global device settings.
Screen capturing and sharing
Android 5.0 lets you add screen capturing and screen sharing capabilities to your app.
With user permission, you can capture non-secure video from the display and deliver it over the network if you choose.
New types of sensors
In Android 5.0, a new tilt detector sensor helps improve activity recognition on supported devices, and a heart rate sensor reports the heart rate of the person touching the device.
New interaction composite sensors are now available to detect special interactions such as a wake up gesture, a pick up gesture, and a glance gesture.
Chromium WebView
The initial release for Android 5.0 includes a version of Chromium for WebView based on the Chromium M37 release, adding support for WebRTC, WebAudio, and WebGL.
Chromium M37 also includes native support for all of the Web Components specifications: Custom Elements, Shadow DOM, HTML Imports, and Templates. This means you can use Polymer and its material design elements in a WebView without needing polyfills.
Although WebView has been based on Chromium since Android 4.4, the Chromium layer is now updatable from Google Play.
As new versions of Chromium become available, users can update from Google Play to ensure they get the latest enhancements and bug fixes for WebView, providing the latest web APIs and bug fixes for apps using WebView on Android 5.0 and higher.
Accessibility & input
New accessibility APIs can retrieve detailed information about the properties of windows on the screen that sighted users can interact with and define standard or customized input actions for UI elements.
New Input method editor (IME) APIs enable faster switching to other IMEs directly from the input method.
Tools for building battery-efficient apps
New job scheduling APIs allow you optimize battery life by deferring jobs for the system to run at a later time or under specified conditions, such as when the device is charging or connected to Wi-Fi.
A new dumpsys batterystats command generates battery usage statistics that you can use to understand system-wide power use and understand the impact of your app on the device battery. You can look at a history of power events, approximate power use per UID and system component, and more.
Battery Historian is a new tool to convert the statistics from dumpsys batterystats into a visualization for battery-related debugging. You can find it at https://github.com/google/battery-historian.
Installing a Blogger theme (GUIDE)
This tutorial will get your newly acquired Blogger theme up and running on your blog in just a few minutes. This tutorial is for Blogger themes only. If you want to know how to add a theme to Wordpress, check our guide on installing Wordpress themes.
1:) Open a new tab or window and go to Blogger.com.
2:)Log in to the website. If you are already logged in, look for this window:
3:) Click the Manage layout link at the bottom.
4:)Now you should see your blog's template. Here you can move sidebar items (called widgets) and add new ones. However, your first task is changing your theme.
5:)In the menu, choose edit HTML.
6:)When you arrive at the Edit HTML page, it's a good idea to back up your existing template. Click the download full template link to do so.
7:) When you made sure you've got a backup of the old template on your hard drive, it's time to change your old template to a new one.
8:) Find the ZIP archive you downloaded from this website and unzip/unrar it.
9:) In the folder contained in the archive, there are three files: license.txt, readme.txt and themename.xml . For instance, if you downloaded the Grandaddy deluxe theme, the .xml file will be named grandaddydeluxe.xml or something similar.
10:) Now you have 2 options.
* Either open the .xml file in a plain text editor (like Notepad on Windows) and copy paste the contents to the edit template field.
*Or, use the restore template function to upload your new template. This seems illogical, but it's the easiest way to add a new theme.
Click the browse button and find the .xml file on your hard drive. Hit the upload button. 11:) Don't forget to save your template.
12:) Finish! Your blog has officially been pimped.
First up, there's two issues here: low system memory (RAM) and low internal memory (storage). We'll show you how to clear up both of them to keep your Android device running smoother and faster.
Low system memory (RAM)
Many older Android devices have 1 GB of RAM or even 512 MB. If you're running some fairly intensive apps – or even just too many – your RAM can start to struggle under the pressure. The first rule of RAM Club is you don't use task killers. These are a lovely placebo if you're into that kind of thing, but task killers simply stop processes long enough for a cool bar graph or pie chart to show an impressive decrease in RAM usage. But those processes tend to start up again only a few moments later, putting you right back where you started.
Android already has a great built-in tool for monitoring your apps' RAM usage.
The best thing to do is keep an eye on how much RAM your apps use and get rid of the problematic ones, assuming you can live without them. There are so many good apps in the Play Store it is always possible to try a bunch and find one with the functionality and resource management you are after. Android has a built in RAM monitor in Developer Options under Process Stats, where you can see the run time and RAM usage (average and peak) of your hungriest apps. If you don't have Developer Options enabled already, just go to Settings > About Phone and tap Build Number until Developer Options appears. You can also use variousstartup task managers like Advanced Task Manager to limit which apps and processes can run on startup.
It doesn't take a genius to realize this means you're running out of storage space on your Android. Too many large games, lots of music, pictures or video will suck up your internal storage before you know it. Depending on the version of Android you have and your manufacturer, it's important to understand how Android partitions internal storage too, so you don't think you have more space than you actually do. While you may be buying a smartphone with 32 GB of storage, you'll find you only have access to around three-quarters of it and sometimes much less (Samsung has been known to use up almost half).
Having an external SD card can be a blessing when you run out of internal storage.
The easiest thing to do when you get a low internal storage warning is to delete some stuff. Clearing your temporary folders and cached data can be a good start, but shifting your music and photos to the cloud is another (or using a music streaming service rather than local storage – but this can have data plan effects you may not like either). The other obvious thing to do is slip in a microSD card (if your phone has a slot for it) and then move everything you can over to the external SD card. You can do this in Settings > Apps > then look for ''move to SD card'' in each app. Music, pictures and other files can also be moved, but system files and apps can not.
The Galaxy S2 has limited internal storage (left) so move apps to SD card whenever possible (right).
You can also grab an app like Link2SD that will help you move everything to the SD card, but apps like these require you have root access. Having root privileges gives you much more freedom, to move apps at will, delete bloatware pre-loaded on your device and more, but we won't go into detail on that here. You can search the site and forum for more information on rooting your device. You can also set default save locations for your downloads and other data activity. Check the settings of the apps you know are responsible (like Downloads Manager or other apps that pull lots of data from the net) and set a default location for saved stuff on your SD card. You'll have to Google how to do this for your specific device, as some are simple and others require a little more work.
You ''can'' create more internal storage by repartitioning, but it's not easy.
On a side note, there's a common belief that getting root and deleting bloatware will magically give you more storage space. This is and isn't true. Because your memory is partitioned into system memory - where everything pre-loaded (like bloatware) is stored - and data, deleting bloatware on the system side technically frees up space, but not space that you can actually use. Any apps you install or downloads you make after bloatware has been deleted will still appear on the data partition. You need to put in a bit more effort if you really want more space, by either resizing the partition or exclusively installing apps to the system partition. Of course, deleting bloatware will make you a saving on system resources like RAM because any processes associated with those apps will be gone.
Go to Settings > Storage > Apps to see your biggest storage hogs.
Finally, know which apps you use are ridiculously huge. If you go to Settings > Storage > Apps you'll see a listing of all your apps in order of size. This is a super easy way to be selective about what apps to delete for a quick fix. Say you have a 1.4 GB game you hardly ever play. Deleting that makes much more sense that deleting twelve other smaller apps you actually do use. Also, deciding which apps you really need and getting rid of the rest not only frees up internal storage but also lightens the load on RAM and CPU. A regular factory reset, after backing up important data and apps of course, is also a good idea for keeping your system running smoothly.
If you want some further info, check out the Android Developers Blog entry on how Android manages memory.
This tips will helps you to find your lost smartphone/androidphone if it's lost or stolen by someone...
Just contact me if you want guide, how Android Device Manager works!!! :)
Android Device Manager can help you find, lock, and erase your phone if you lose your Android device.
To use Android Device Manager, you only need to add your Google Account to your device.
Android Device Manager
---Open the Google Settings app on your device and touch Android Device Manager. By default, the option to remotely see your device’s location when using Android Device Manager is activated. Here you can also activate the option to remotely lock your device, erase everything on it, or change the lock screen pass code.
Accessing Android Device Manager's options is also possible on the web at android.com/device manager or by using the Android Device Manager app in the Google Play Store.
The version history of the Androidmobile operating system began with the release of the Android beta in November 2007. The first commercial version, Android 1.0, was released in September 2008. Android is under ongoing development by Google and the Open Handset Alliance (OHA), and has seen a number of updates to its base operating system since its initial release.
Since April 2009, Android versions have been developed under a confectionery-themed code name and released in alphabetical order; the exceptions are versions 1.0 and 1.1 as they were not released under specific code names:
If you have successfully gone throught the Installation tutorial, you are now ready to build live wallpapers. Now, let's make a very simple live wallpaper.
Background
All live wallpaper creation will take place under the Project tab, so make sure you are there.
Select a picture from your Work Folder on the left. Let's pick the Orange Flourish.jpg. You will see the picture appear under the Preview tab.
Select the area to be used as the background for your live wallpaper. You need to select two crop sizes: High Resolution and Medium Resolution. The 2 crop sizes specifically cater to different to common device screen ratios. When you are done positioning the crop frame, click Set.
You can move the crop frame around freely by left-clicking and holding it to move it to the desired position. Right-clicking will result in horizontal movement only. You can also make it bigger or smaller by clicking on the square in the bottom right corner of the frame and dragging it to fit your desired size.
LWC provides some padding for your background in case you want to use it. You can change the colour of the padding if you wish.
Items
Now that the background for our live wallpaper is set, we need to add some items to it. LWC allows you to add pictures as items that will appear over the top of your background. There are various properties that you can customize in order to conrol the behaviour of your items. But more on that later, let's first pick some pictures as our items.
Click on the Items tab.
Over in the Image Library, click on the Items folder
All the pictures in the Items folder will appear on the right side of the Image Library.
Left-click on some pictures to add them to the Items list (top left section). If you change your mind about an added picture, you can always right-click on them in the Items list to remove them.
To control how many items appear on the screen, we can set the Item Count value.
We'll set ours to 15.
Now we need to decide where we want our items to spawn. The options are:
Border: items spawn at the border of the screen.
Random: items spawn in random locations on the screen.
Centre: items spawn in the centre of the screen.
Touch: items spawn only when the user touches the screen and at the location of the touch.
Let's set our location to Random.
Since we are keeping it simple for our first live wallpaper, we are not going to add any interaction controls. Select None for the Action Style and click the Disable Interaction checkbox.
Item Properties
We have picked our items and decided on the spawn and interaction modes (random and non-interactive). It's time to configure the properties of the items.
Click on Item Properties tab. There you will find 6 item properties:
Speed: controls the speed at which the items move on the screen.
Direction: controls the direction in which the items move on the screen.
Scale: controls the size of the items upon spawning.
Angle: controls the orientation of the items upon spawning.
Opacity: controls the transparency of the items upon spawning.
Rotation: controls the speed at which the items rotate (counter-clockwise) on the screen.
List Notation
You can enter multiple values and ranges of values for each property using commas and dashes respectively. This is called list notation and allows for great flexibility in your wallpapers.
Additionally, we are allowed to have multiple presets for Speed and Direction. These presets will appear in the live wallpaper settings when it is installed on the end-user's device. You can also name your presets whatever you want using the Title fields.
Let's set our speed presets as follows:
Slow: 10,20-30
Medium: 40,50-70
Fast: 80,90-120
As you can see, we are using list notation to combine single values with ranges. Whenever the item spawns, it will randomize a speed value from this list of values here.
To figure out how Direction works, you may use the compass chart to orient your items. 0/360 is right/east, 90 is top/north, 180 is left/west and 270 is bottom/south. Let's set our Direction presets as follows:
Straight up: 90
Every direction: 0-360
Left and Right: 135-225,315-405
The other properties are configured in similar fashion, however, they will not appear as selectable presets in user settings, therefore, there are no title fields. Let's set them up as follows:
Scale: 75-100
Angle: 0
Opacity: 50-100
Rotation: 50-60
Building
Now that our background, items and their properties are configured, we are ready to build our first live wallpaper. Since this is a very simple live wallpaper, we are skipping Interaction, Fonts and Promotion tabs. These will be covered in the next tutorials. Let's build our wallpaper now!
Click on the Build tab.
Give your wallpaper an appropriate name. We'll call ours Orange Flourish LWP.
Select the company that you want to sign your wallpaper under. You should have an available company from the previous tutorial.
Type in your password and alias (case sensitive).
Click Build.
If you want to build and install the wallpaper to your device right way, you can click on the Build+Install button.
Your project will be compiled into an apk file. The apk file will be created in the corresponding project folder inside the archive. Access your archive folder using the shortcut button on the bottom left of the screen.
Testing
To test your newly built live wallpaper application you need to connect an Android device via a usb cable or run an emulator via AVD Manager. You can access the AVD Manager from the Settings tab.
Once a device or emulator are ready, click the Build + Install button to install your wallpaper.
Alternatively, you could transfer the apk file from the archive to your device, and install it manually. You will need to have a file browser app installed to navigate your Android device's file structure.
Congratulations on creating your very first Android live wallpaper using Live Wallpaper Creator.
Previous Tutorial: Installation Guide
----- Thanks for reading my post, hope you'll enjoyed it!
Stay tuned guys to my blogs, so i can create more informations and tutorials about android phone and others... :)))
the photo below is the "Unfinish Experiments" created by me. feel free to ask me and add me on.fb.me/1xUS564